The Basic Basics
We appreciate that Space Station 13 and BYOND are an unusual platform, and quite unintuitive. Therefore, this guide is here to walk players through a step by step process on how to join and play the game, with all the essential components that they might pick up quickly anyway and a lot of experienced players take for granted. For a more general look at how the game works, try reading The Basics.
This page goes into more detail about how to connect to the game, and gives a less detailed description of how to actually play, assuming that the reader has no SS13 experience at all.
What is BYOND, Space Station 13 and VoreStation
BYOND is an old game engine with it's own code. It's designed for people who are not traditional programmers to be able to make their own 2D multiplayer games and easily host them to play with other people. It is modestly powerful, flexible and very easy to add to without much coding experience. Games that are made on BYOND are hosted and played using its clients.
Space Station 13, or SS13, was originally released back in 2003 as an atmospherics simulator for BYOND. Eventually this was molded into an espionage game in which a crew is responsible maintaining a space station whilst some antagonists are assigned amongst the crew, who have objectives to kill or steal from the crew without being caught. Once this game was decompiled and made public, the community for the game exploded, allowing for many different servers with different settings, objectives and playstyles. It now has a long history with hundreds of communities and codebase branching of in all sorts of directions, with all the stories and memes that entails.
VoreStation is just one of these servers for SS13, with it's own goals that are distinct from most others. Here we do not have antagonists, the rounds are just over 6 hours long and people generally just do their job in a low risk atmosphere, and are exclusively for people who are over 18 years old. All of this is for the goal of enabling one thing: Vore. Players are encouraged to get to know each other in relatively serious roleplay, to find people who match their sexual and vore preferences and then to go into erotic roleplay with one another. We have a myriad of features designed to facilitate vore, from the actual mechanics of eating people, to the rules of respecting one another's preferences.
How to download and set up BYOND

To actually join the game, you will need to download the BYOND game engine. You can do this at http://www.byond.com/download/
Once you have downloaded the version for your operating system, you need to either install it via the .exe that comes with it, or extract the zip folder that you have downloaded and start the byond.exe in the /bin folder. It's that simple, this application is used every time you wish to launch the game.
You will need a BYOND account to actually play the game, and you should make one at https://secure.byond.com/?page=Join A BYOND account is completely free, and requires only a username, password and email. You should, as with any site, use a unique password that you are able to either store safely or remember reliably.
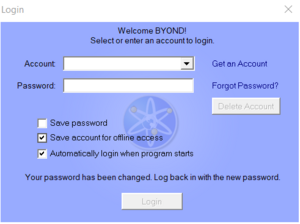
Once you have created an account, you are able to launch the byond.exe application and log into the login screen. You must not proceed as a guest from the login screen, despite the option being available, as VoreStation does not allow guests to connect.
How to connect to VoreStation
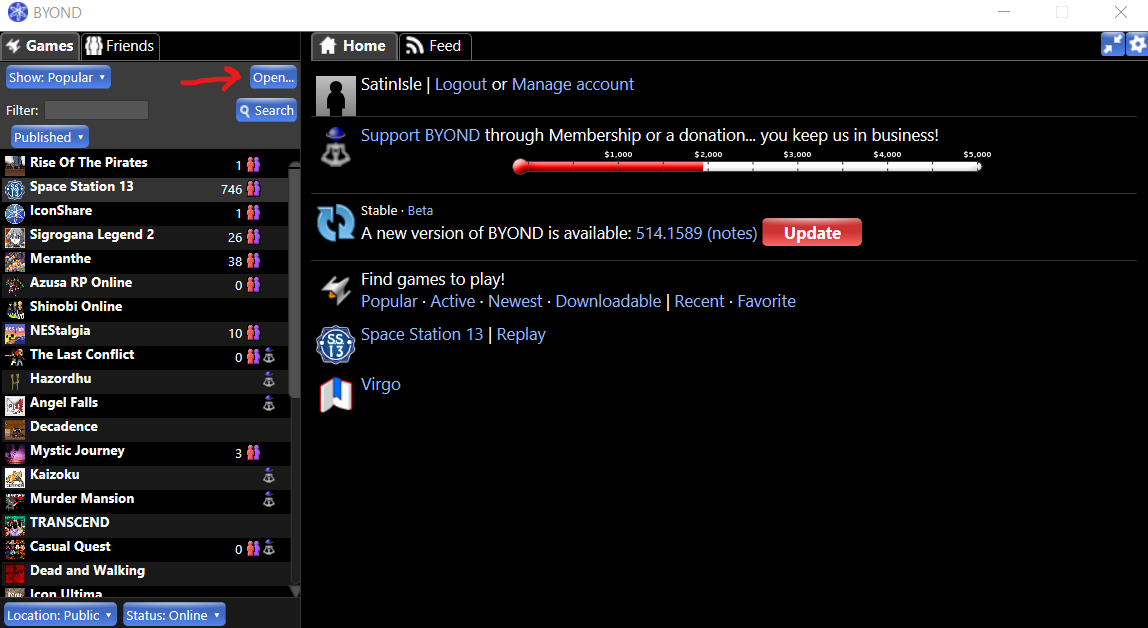
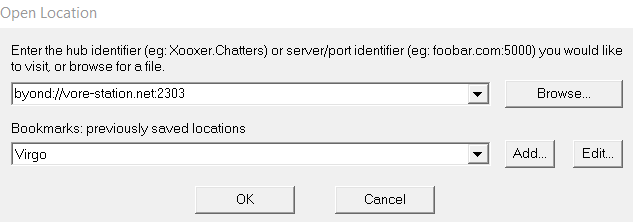
VoreStation is open to the public, but it is not listed publicly on the BYOND server browser, as to not encourage people who aren't interested in vore to join. Connecting to VoreStation is easy, but the buttons might not be in the most obvious place. The first thing that you need to do is press the Open... button in the top left. This will produce a pop-up that allows you to input the address of the server in the top bar: byond://vore-station.net:2303
You can use the bar below this to then save this address as a bookmark, so that you don't have to enter it every time you want to play. With the address in the bar, you simple need to press OK, and BYOND will open another window where it will download all the assets specific to our server. After a moment of downloading everything that it needs, the game itself will launch.
Here are a couple of screenshots to help you find what you need:
Firstly, this is where you can find the open button on BYOND's server browser.

Finally, this is the Open location pop-up and where you should input the address.
The start screen

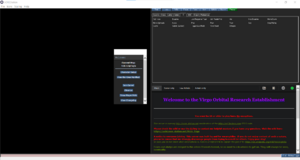
Once you have started the game, you will be treated to the screen shown in the image here. There are obviously a lot of buttons here, and it might seem a little overwhelming at first. Here we'll briefly cover the most important ones to look at.
The VChat window
When you first join, you'll likely notice a lot of text in the bottom right of the screen, this is the VChat window. This is where the meat of the game happens. Anything anyone says that you can hear will pop up here, along with actions that you can see them do. If you get hurt, it will appear here. If you use a health analyser on another person, this is where that information about their health will pop up! This part of the screen is where almost everything happens.
It is also customisable, and you can create additional tabs in it. However, that is a little bit too complicated for this guide of the basics.
The verbs window
In the top right, you'll see a number of disconnected words that function like buttons, all under different tabs. These words are called verbs and are also able to be used by typing them into the command bar at the bottom. Using them generally does something, and many of these are described at the bottom of the screen when you hover over them with your cursor. They different tabs that they are split into depend on their function:
- Examine shows information about the last thing that you examined in game.
- Status tells you a bit about the current round. This includes important things like the current in-game date and time, but more importantly, the current duration of the round. Remember that the round will go up to 6 hours long.
- Lobby is useful for telling you information between rounds, whilst the server is starting up. It tells you who is on, what role they have tried to join and how long until the round starts.
- Admin gives you options to make an adminhelp and mentorhelp, these are important to remember and can be accessed from the F1 button too.
- Abilities gives you access to your species or trait chosen abilities.
- IC generally gives you a list of functions that your character can do in character, such as movements, talking or modifying IC information.
- OOC gives you a list of functions that you as a player are doing out of character. Such as checking who is online, exporting logs, speaking out of character.
- Object gives you a list of functions that you can do to objects in game that are in range of your character, or on their person.
- Preferences is a list of quality of life functions for toggling features of the game that you might find annoying.
Character Setup
This button will bring you to the character setup screen. We have a page that goes deep into Character Creation, so here I'll give a brief overview of what you should need to do. First of all, you are presented with the options to pick your characters name, age, pronouns and set up their OOC notes. These OOC notes are very important, they are the main thing that will let people know what sort of erotic roleplay scenarios you are interested in, and (just as importantly) those that you are not interested in or are uncomfortable with. Then, under the body section, you are able to start adjusting your characters appearance. First by choosing their species, then their skin/fur colour. You are also able to manually adjust their hair, facial hair, ears, tails, wings and individual markings to really personalise your character to get them looking however you want them. Of course, you're always limited to a 32x32 sprite. In the bottom right of this, you can choose to set your flavour text. This is similarly very important, because the sprites are only so detailed, you will want to give your character a nice description of how they look to others. This is not how your character tastes! (That is set elsewhere). There are then other tabs along the top that you should explore. These will allow you to set your preferred jobs, the equipment that your character starts with and a few more personalisation options in the VORE tab.
View Crew Manifest
This button is simple in that it just brings up a list of everyone who is currently in the round right now, and what their jobs are. You can use this to get an idea of what jobs might be needed to be filled, or who you might want to hang around with. This can also be viewed at https://vore-station.net/manifest.php
Observe
This button allows you to join the game as a ghost! A ghost can not interact with the round in any way, other than speaking to other ghosts. This is simply a way to have a look around the map and get to know what is going on. This can be useful to a new player to learn the general layout of the station. However, you must not use information learned as a ghost after joining the round.
Joining the game
Once you have set up your character and familiarised yourself with the basics of how the game seems to work, then you are ready to get yourself into the game. Simply use the "Join Game!" button to get in there. Once you press this button, you'll be given a list of jobs that you've selected from what you'd like to play.
You might be wondering which job would be a good start if you're completely new, so here are a few popular suggestions:
- Intern is a good choice if you want to learn how to do more serious jobs, but have no expectation to commit to them. You can switch your intern job title to something more department specific, such as medical intern, if you want to personalise it a bit more. People are often eager to teach interns that want to learn, don't be afraid to approach people to ask if they're willing to help you out. This can be a great way to form some bonds.
- Janitor is a very popular new player role! They have some mechanical work to do in sweeping the floors and tidying away trash, but very little expectation from the rest of the crew to perform. It's also a good way to learn your way around the station.
- Bartender and Chef are a little less simple than all of the above, but are generally low enough responsibility that you can practice the roles at your own pace. These are also good choices for encouraging social interactions with other players.
- Visitor is often a good choice for a first time player. They have literally no responsibilities and are canonically just visiting the station for whatever reason you can come up with. Though with no ties to the station at all, it can be difficult for new players to find hooks to join in with roleplay.
- Entertainer, Entrepreneur and librarian are all roles that are focused mostly around roleplay with little-to-no mechanical responsibilities. Each of these job titles can be switched up to a variety of fun alternatives too. These jobs require some amount of creativity to get going with though, which can be hard to muster for someone completely new to the environment.
Also keep in mind that, aside from the head roles, you are allowed to play whichever role you'd like and learn on the job. Though we do discourage the same character switching departments constantly.
Playing the game
Now that you are actually spawned in the game, you have the ability actually interact with the world and other people. It can be a little daunting to some people at first, so here I'll give some recommendations on the basic functions of the game.
Interacting with the world
First, we recommend turning on hotkey mode to get used to it! This will enable you to use WASD to move around the game, otherwise you are limited to using the arrow keys. Some people prefer it off to make it easier to type into the command bar at the bottom without clicking on it. Once you're moving around, you will find that doors generally open when you walk into them, if you have access to them.
Most items around the world can be interacted with by simply clicking on them, but usually only when your character is stood immediately next to them. Some items are picked up into your hand, or if you already have something in your hand you will attempt to use the held item on what you're clicking. Some items are used immediately by clicking them, such as buttons. Other items might bring up a pop up screen to control them in some way, like computers. Often, you can find specific functions for an item by right clicking, which brings up a list of all the items on a tile and everything that you can do to them. This can also be used to pick up items that are hidden under other items!
You will often want to examine items and people, either by right clicking and selecting examine, or by shift-clicking on them.
What you do when clicking on a person or item often depends on your intent, which is selected by the four squares in the bottom right. Help (green) generally does safe actions. Disarm (blue) is moderately aggressive and will push a person. Grab (yellow) will attempt to grab ahold of a player, this will create an icon in your hand that you can click on to reinforce the grip. Finally, harm (red) will attempt to hit or otherwise attack the thing that you are clicking on. It is recommended that you stay on help intent most of the time to avoid awkward accidents.
Most things that aren't bolted down can also be gently pulled along by right clicking and pressing pull, or by ctrl-clicking on them.
Equipment

Pressing the backpack symbol in the very bottom right will expand your equipment menu. From here, you can equip your clothes, radios, ID and anything else that you might be carrying. A lot of items, such as your backpack, also can be opened just by clicking on them to access the items inside.
You may notice a couple of hand symbols in the middle, these are your hands. One of them will be highlighted, this is your active hand and is the one that you will attempt to pick things up with or use held items with.
Clicking on a piece of equipment that you are wearing will usually remove it into an empty active hand, but if that item is also a container you will need to click and drag the item into your empty hand to take it off.
It is worth ensuring that you have your ID in your ID badge slot at all times, as this will allow you to properly use doors and machines that have access requirements.
Speaking to others
You can speak at any time by either typing "Say" into the command bar, pressing F3, or T in hotkey mode. This is audible to the people that are in range to see you.
You might notice green text in the chat, this is people speaking over the radio! You can also speak over the radio as long as you have a radio headset on (which all jobs start with). To do this, just start your Say message with ; and you will have anything posted after it transmitted onto the radio. Easy. If you have a departmental radio, you can speak your department alone by starting the message with :h
You can perform more physical actions to the people around you by using emotes with the "Me" command, pressing F4, or 5 in hotkey mode. This is visible to anyone in range to see you and is often used for more complex actions.
There are also short ranged versions of these commands, such as whisper (y in hotkey mode) and subtle (6 in hotkey mode). These are only transmitted to the tile you are on and to the ones directly next to you.
Finally, you can also speak OOC if you need to do so. The OOC verb is used to speak to the whole server at once, and should not be used very frequently. The LOOC verb is used to send an out of character message to everyone that is in range to see you. LOOC is particularly useful when discussing preferences, making sure everyone is comfortable and to arrange scene stuff. Also for having a bit of a laugh with your friends, just don't metagame with it!
Vore
Vore is an important part of this server and the main reason that it exists in the first place! The mechanics around vore here are pretty in depth and won't be able to be properly covered in just this basics guide alone.
You can see a detailed guide on how to do vore at the Guide to Vore. You can find a detailed description on how the vore panel works at the Vore Panel page.
The most important thing about vore here is that you examine other players and check their OOC notes before trying to engage them in any sort of vore action. Check that they're actually into what you are into, and if there is any sort of uncertainty, use LOOC to clear any possible confusion! Last thing we want is you to feel embarrassed because you assumed that someone was going to be into something and they weren't, nor do we want you to have to experience things that are uncomfortable for you.
Actually finding someone to do scenes with can be a little tricky when you are new and don't know the people around you. The best recommendation for this is to just get into playing your character seriously to start with, and get to know other characters through normal roleplay. It's generally true that vore is treated a little bit like a taboo subject on station, just like talking about sex at the workplace, so keep that in mind when talking over the radio.
When you have finished your scene, be sure to be curteous to other players and clean up any mess. It's against the rules to leave a gruesome mess or bones behind for other people to find. If you are a predator, you can put your prey's items in special blue disposal chutes near the resleever rooms, called "Auto-resleever equipement deposit" chutes, which will clean the items and return them for your prey.
Respawning
Death isn't a big deal here, at least out of character. If you die on station, you can usually respawn on station within 30 minutes, or 15 minutes if it's a vore related death. There are machines in the medical department called resleevers that are used to create new bodies for you to revive into. The actual mechanics of how this work are intentionally not described, but we do insist that it's perfect cloning in which the person who is resleeved is the very same entity who had died, to avoid uncomfortable conversations.
If you took a mind-backup implant any time before death, usually found in the medbay lobby, you can press the Notify Transcore button in the ghost tab to let active medical personel know that you need to be resleeved. This can be quicker, but sometimes medical staff just aren't around or free to do it.
There is also the option of using an auto-resleever, which requires no medical personel to help with. These can be used after 30 minutes (or 15 minutes for a vore death) to quickly revive. To find the location of these, simply use the verb "Find Auto Resleever" in the ghost tab. Then, simply click on them to revive once your timer is up.
Leaving the game
Actually leaving the game is a bit more involved than just turning it off! If you turn the game off, your character still exists where you left them, unconscious. This isn't a good thing, and can lead to an awkward, messy station. So, if you need to leave, you should find either a teleporter room, the tram or the cryo room. These will generally be where you arrived from in the first place. It may require you to click and drag yourself onto the teleporter or cryopod to actually enter them. Once you are in them, you can use the ghost command to leave the shift, or even just close the game.
If you have died, especially if you are digested, you can also just leave when you are a ghost. However, you MUST NOT intentionally kill yourself.
If you have to leave in an emergency and don't have time to get to an exit, feel free to use adminhelp to ask an admin to cryo you and then log out, the admins will take care of it.
Further Support
Mentorhelp is a very useful tool, it allows experienced players in game to answer your questions as they come up. Use mentorhelp as much as you need to, we promise that the mentors will never be annoyed, they're usually fighting over who gets to be the one to help!
If you have a much more serious question about the rules or the game, and want a member of staff specifically to answer, we encourage you to adminhelp it.
The discord for this server is very active and we have a special channel called #cadet-academy set up specifically to answer your questions, people are often quite fast at replying: https://discord.com/invite/Zd5WMuq
| Guide Table | ||||||||
| Starter | VORE-Specific | Medical | Engineering | Science | Security | Other | Development | |
